
Creative Home, Sewing, Sharing, & Crafts, and highlights from PostalThreads
H is for... Hexagon Pillow
I love to sew, but I do not consider myself a quilter--I have not delved much further than this pillow. But this project was the perfect amount of piecing for me! :) Thanks to Kim at Retro Mama, and her easy-to-follow tutorial, complete with clear instructions and beautiful photos, here, I sewed a hexagon pillow!

G is for... "Give Thanks" banner
What I Did: Pulled together some Fall/Thanksgiving fabric from stash, along with a few odds-and-ends---scraps of lace, buttons, wooden beads, etc. Cut out the pennants, & burlap letters; sewed burlap letters to front pennants, then sewed them front to back, right sides together, flipped them, pressed each one, made "bias tape" with my bias tape maker--I just cut it on the crosswise grain, though; and pinned it to the pennants. I wish I would have over lapped them a little differently than I did, like left OVER right, instead, but oh well.

What I Did NOT Know Until Long After This Project Was Complete!: Walmart carries di-cut alphabet packages of burlap letters!!! That would have been nice to know seeing as I found a font in outline form that I liked, printed it off, and then cut every single letter out of paper and burlap, individually!...oh well! [And! Just now, I learned they carry seasonal red burlap di-cut letter packages besides these natural color letters.] By the way, if you sew with these di-cut letters, realize they have adhesive, so don't let the gunk build up too much on your needle, and be careful getting it off.
A Few Notes About Bunting & Banners: I believe it was around the time of this project, or not long after that I came across my ALL TIME FAVORITE simple YouTube tutorial on making your own pennant bunting. Measurements in this tutorial are given in centimeters; if it bothers you, convert it to inches, but realize you just follow the same principle of doubling or halving. It will make more sense after you watch the 3:19 minute video. Also, if you are not adding any little "extras" to the pennants, then having your fabric right sides together to begin with saves time, by saving you from having to turn and match triangles.
And just for fun, I found this cute post on Miss Party, called "Buntings, Banners, Pennants and Garlands -- What's the difference?" here, if you're interested.
G is for..."Give Thanks" Banner....and garland, and grommets, and so on!

What I Did NOT Know Until Long After This Project Was Complete!: Walmart carries di-cut alphabet packages of burlap letters!!! That would have been nice to know seeing as I found a font in outline form that I liked, printed it off, and then cut every single letter out of paper and burlap, individually!...oh well! [And! Just now, I learned they carry seasonal red burlap di-cut letter packages besides these natural color letters.] By the way, if you sew with these di-cut letters, realize they have adhesive, so don't let the gunk build up too much on your needle, and be careful getting it off.
 |
Adhesive Die-Cut Burlap, Alphabet, Natural, 2 Packs |
And just for fun, I found this cute post on Miss Party, called "Buntings, Banners, Pennants and Garlands -- What's the difference?" here, if you're interested.
G is for..."Give Thanks" Banner....and garland, and grommets, and so on!
F is for... Fairy Tale Theme Decor
We hosted a "Fairytale Mystery Menu 'Breakfast For Dinner'" party for the 8-11 year old girls from church. I had fun making decorations. This is what came together:

- The Seven Dwarfs, inspired by Tissue Tube Dwarfs at Disney Family [Thorough tutorial! Love it.]
- Talking Doorknob, from Disney Family, here.
- The cutest egg carton mushroom/toadstools ever! Inspired by a photo from this Egg Carton Gallery on Flickr. [Great way to use up an egg carton stash! Painted red with foam brush & applied white dots with cue-tips]
- Center Pieces: Each girl took home a dollar store butterfly "flower" (these came in bunches, so that worked out great). Crayons inside candle votive, with white beans. Crayons were for their fairy tale"place mats"--Printed at the local library--5 cents/page on 11x17 paper.
- "Little Red Riding Hood" cape & basket from our Easter decorations box (Cape featured in upcoming "L is for... Little Red Riding Hood cape")

F is for... Felt Bows--Perfect felt stash buster & links to free templates!
My cousin introduced me to these adorable felt bows. We made a whole bunch one afternoon. The two styles along with free templates came from the following places: Six Sisters Stuff, here, and KikiComin, here. Pull out your felt scraps and off you go! Enjoy!

E is for... Envelopes
Once you have made one, you might as well make all 14 for a countdown to Valentine's Day. These fabric envelopes are charming.

What I Did: I rounded up all the reds & pinks & whites or cream color fabrics I could find in my fabric stash. I also selected a few buttons from my stash. Then I splurged and bought some seasonal Valentine's fabric from the store, and a few more buttons. I used a stiffer fusible interfacing that I already had rather than the fusible fleece that the tutorial suggests (see tutorial details below). And then I went for it. Any time there is a project where you make the same thing over and over again, and whatever it is, is "soooo cute!" I seem to really get into it, and I begin to imagine grand schemes of making what ever it is, for every sister-in-law and friend or neighbor I know! Usually I do not get that far and am mighty proud of completing one finished project. So here it is!
Inspiration & Tutorial Details: Thank you, Bev, from Flamingo Toes who is the featured sewing contributor to Kristyn's blog, Lil' Luna. Click on either blog link to take you to Bev's tutorial and beautiful photos! I love the ideas Bev shares for love notes or acts of kindness ideas to place in each envelope!
By the way, here, Martha Stewart also shares a version of a fabric envelope tutorial. However, it does involve decoupage, which may or may not suit your fancy!
D is for... Diaper Stacker--A Gift in the Guest Room For Only One Yard!

We had a lot of family in town last summer. I made this diaper stacker for my brother & sister-in-law & their Little One, who occupied a tiny guest room. This was a perfect space-saver to hang from a hook on the back of their bedroom door. I found the dimensions for the project from my "new favorite" library book: Little One Yard Wonders (see details below).

Little one-yard wonders : irresistible clothes, toys, and accessories you can make for babies and kids
By Rebecca Yaker & Patricia Hoskins
ISBN: 9781612121246
Physical Description: 359 pages : color illustrations ; 22 x 23 cm + 6 sheets of patterns.
By Rebecca Yaker & Patricia Hoskins
ISBN: 9781612121246
Physical Description: 359 pages : color illustrations ; 22 x 23 cm + 6 sheets of patterns.
C is for... Candy Corn Costume--Sew A Halloween Costume For A Child

Baby was born in the fall. I could not pass up the opportunity to dress her for Halloween. And what is more special than making the costume yourself? I loved that her little white hospital hat was "the icing on the cake" to complete Our Little Candy Corn.
There are several images out there for baby/toddler candy corn costumes, but the resource and tutorial I found most helpful came from Jenni at Snippets Of My Faith, Family, & Crafting, here. Thank you, Jenni!
What I Did: Baby wore a long-sleeve white onesie underneath. Then I used materials I already had--white, low pile, soft, knit fabric left over from a baby blanket, sewed a casing on the front piece & one on the back piece for the ribbon ties, and clean-finished the arm holes so the fabric would stop shedding the little pile fuzz; orange felt; yellow felt; and some orange and yellow embroidery floss to add a blanket stitch for a little extra detail. And as I mentioned before, we had her wear her little white hospital cap she wore in the nursery.
The grandparents LOVED the costume!
C is for Card Table Tents--Sew Your Own "Princess Palace"

Good old fashioned card table play tents have made quite a come back in the last decade. You can find really any theme you can imagine out there, from castles & pirates, or carnivals, to quaint little shops & home designs, or even a car wash!
Favorite Tutorial For Card Table Tents: My absolute favorite online resource for card table tents is found here at Old Days Old Ways blog by Wendy. She gives measurements for walls, and shows you how to create the roof, along with several ideas for variations.
What I Did: Inspired by the second tent Wendy features on her Classic Card Table--With Variations blog post, I up-cycled an extra shear curtain I already had, and some scrap fabric--leftover eyelet from another curtain for the trim, and some pink satiny remnants for the roof, to create what we, at our house call "The Princess Palace." You can use a dowel or a paper-towel roll, or cut down a wrapping paper roll to the correct height to make the roof stand up. The photos here show our tent, indoors, but I loved taking it outside in the summer and watching the shear walls wisp around in the breeze.
I love how quickly a space can transform into imaginative play with a card table tent. Simple card table tents sew up relatively fast and make for great gifts too! They are a great project to use up your fabric or up-cycle other pieces if you have quite the stash!
B is for... Butternut Squash Ghosts

What I Did: Inspired by a photo I saw in another library book (see below), I up-cycled an old, worn out pair of white tights by cutting the leg parts into into three sections and discarding the rest--three sections, since, at the time, I had 3 butternut squash on hand! Then I used sticky-backed black felt (found at most craft stores), to cut out "ghost eye" shapes. The templates in the back of the book were helpful in coming up with some of the eye shapes. Then I stretched a piece of stocking/tights over each butternut squash, stuck the eyes on, and set out my new decor! The stocking ghosts are so easy to store when the season is through. We love butternut squash in the fall so it's a given that we'll have some around.
Idea Inspiration: One day at the local public library, I came across Matthew Mead's Monster Book of Halloween. ISBN: 9781603201056 Publication Information: New York, N.Y. : Time Home Entertainment, c2009. Physical Description: 256 p. : col. ill. ; 28 cm.

This book is so fun. Every page is loaded with pictures, ideas, and brief descriptions. In the very back there is an entire section of templates from miniature jack-o'-lantern faces, bats, cats, ghost garland, a moon man, to candy corn, and more!
On page 129, I came across the "Gourd Warmer". It suggests embellishing, with black yarn stitches, an orange small, child-size knit hat to create a jack-o'-lantern face, and then to pull it over a gourd--looks to me like a butternut squash.
I thought, "I don't have an orange knit hat, but I have a pair of white tights I am about to throw out!" A few moments later I had three little butternut squash ghosts!
Try it! Your guests will be sure to comment on your clever gourd ghosts!
B is for... Baby Blessing Dress--Sew something special for someone in your family

Love & Don't Love the Peter Pan Collar: I love the peter pan collar, when Baby is not wearing the dress (except ironically in this picture it actually looks like it is laying pretty flat). Most of the time, the peter pan collar would not lay flat and she looked like a baby in the Renaissance Period with one of those big popped collars around her face! It probably is more telling of my skills than anything...I did not research sewing peter pan collars on baby clothes before I followed the commercial pattern instructions. Now I know better, "for next time." Other than that little misfit, the pattern was easy to use, and I like how it turned out.
The Pattern: Butterick B6045 I wanted the dress to be long, but not as long as the pattern indicates. I also opted out of making the sash and kind of did my own thing with a lace-y beaded ribbon in front, and added some ribbon on the side seams to tie into a bow in the back.
 |
| Butterick B6045 |
 |
| (Back) Butterick B6045 |
Where is Baby's Blessing Dress Now? Baby's dress is hanging on her wall next to her crib. I would rather have it collect dust there, than stuffed away in a closet. Size wise, it was a little big the day she was blessed, but looking at it now, my how fast she has grown! If you are considering sewing something special for someone in your family, do it!
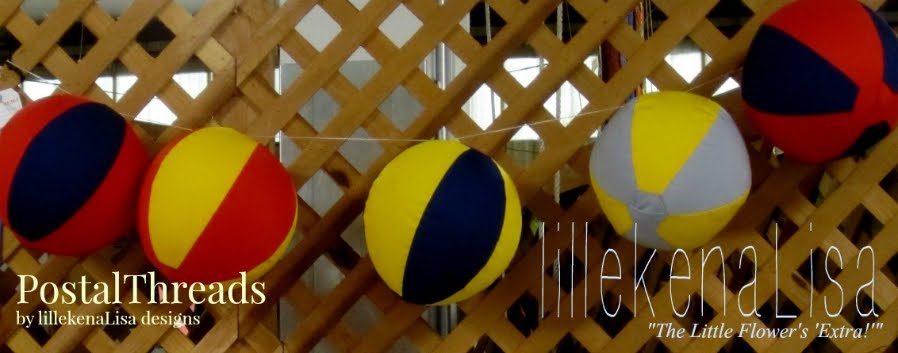
B is for...balloon balls banner--Simple Scallops & DIY Double Folded Bias Tape

What I did: I went to my local craft store where they provide an amazing service: a self serve di-cut station. I think I chose a "Roman" font to create stencils from card stock for the lettering. [If you do not have access to di-cuts or ready to use stencils, you can create your own, and changing it to "outline"]. Then, I used off-white or antique color acrylic paint and a sponge brush to paint each letter. If you look closely, you can see how the letters are not perfect, but I still like the way they turned out. If you want to go for "perfect" you may do well to do the method suggested in the Birthday Banner tutorial in the book I mentioned. She uses freezer paper to cut her stencils out and irons each one on, paints, then waits until it was completely dry to remove the stencil.
Bias Tape Maker: The tutorial in the book suggests using double-folded bias tape, but since I have had so much fun making banners, buying a 1 inch (25mm) bias tape maker for a few dollars has been well worth it! That way I just use the same fabric as the scallop pieces. Bias tape makers can be found in the quilting notions section in a fabric store.
Inspired By:
 Stitched in time: memory-keeping projects to sew and share from the creator of Posie gets cozy
By: Alicia Paulson
ISBN: 9780307406262
Published: New York : Potter Craft, c2008.
B is for... Baby Blankets
 Baby Blankets
Basting spray was new to me at the start of this project. This project idea came from my cousin's wife who made a sweet blanket for her little one similar to the blue blanket here. She said she used basting spray to keep all the little flannel "patches" intact. Then you stitch around all the fabric patches--raw edges exposed! I did not stitch around every single patch individually, but rather I stitched a grid. For the pink blanket, I stitched the grid through top part of the blanket and the batting, only, because it would have been too thick with what I used for the back. But for the blue blanket, I just used fleece for the back, so then I stitched the grid through all the layers.It was fun deciding where the fabric patches would all go. Then sewing it up went relatively fast, especially for a "quilt". When the blanket is finished you run it through the washer & dryer similar to how you would "finish" a rag quilt, then trim up the fabric patch edges and then snuggle your precious baby. I do not recommend this as a quilt you would ever leave in a crib, in case of over-looked loose thread wads, but it sure makes for a soft "play mat" and cuddly blanket.
A is for...alphabet Scrap Buster Fabric Alphabet Letters

Scrap Fabric Alphabet Letters
These are fun. You can find a bunch of tutorials out there. I do not recommend any specific one.
Pattern: I used "quick letters", found near the poster board in stores, (see photo below) for a pattern for each of the letters.

What I did: Sandwiched a piece of lightweight batting between two pieces of fabric. The fabric was facing "right" sides out. Machine straight-stitched around the letters, about a 1/4" away from the edge. Then I took pinking shears to them, all around the edges.
Tricky Part: Getting the pinking shears to cut inside the holes in a, b, d, o, p, q, and r was a little tricky.
My Little Spin on Things: I have soooo much scrap fabric! And I love fabric and I love to sew. So...I decided to associate each letter with a type of fabric, or other wise some fabric characteristic, which ended up, for some, being associated with the first letter of the color of the fabric I used. See the larger photo and list below!

A--airplanes on fabric
B--blue fabric
C--corduroy
D--denim
E--eyelet
F--felt & flannel
G--green fabric
H--houndstooth design
I--interfacing
J--jersey knit
K--knit
L--lace
M--muslin
N--netting
O--orange fabric (felt)
P--pink fabric
Q--quilted fabric
R--red fabric
S--stripes on fabric
T--twill weave
U--upcycled an old soccer uniform
V--velvet
W--wool
X--black & white fabric--associate with 'x-rays'
Y--yellow fabric
Z--zipper
What Else? I decided to make the letter "z" have an actual tiny zipper pouch. I didn't have anything to follow. In the end I was glad I had sewn a little pull tab at the top of the zipper.
I wish I would have made a set of numbers while I was at it. I think I began in alphabetical order. By the time I got to the letter I--a simple rectangle--I thought why am I not making multiplies of these?? So I went back and made more.
If I did it over again, maybe I would follow Scrabble pieces as a guide, meaning: Scrabble tile letter distribution is as follows: A-9, B-2, C-2, D-4, E-12, F-2, G-3, H-2, I-9, J-1, K-1, L-4, M-2, N-6, O-8, P-2, Q-1, R-6, S-4, T-6, U-4, V-2, W-2, X-1, Y-2, Z-1.
Or depending on how you plan to use the letters, make sure you have enough of each letter to spell out phrases, words/names you will display.
What We've Done: We have a string above our kitchen sink, going across, and we use the teeny-tiny clothespins to hang up some of these fabric letters to spell out our family theme for the year. The rest of the letters, I store in a purse from the "dress up" bin. Our Little One loves 'in and out' right now. These letters are fun for her to hold and take out and put back, over and over again!
Introducing The "Sew Up A Storm" Alphabet Series
The "Sew Up A Storm" Alphabet Series is the way I have decided to visually present many of the things I have enjoyed sewing in the last few years. [If you can believe it, I have actually enjoyed making other fun projects aside from balloon balls, although blog posts may convince you otherwise]. Yes, yes, you can find a variety of tutorials, photos, & inspiration for similar projects online, but the following things are what you will find here:
- If there was a specific tutorial I recommend, or that inspired me, I will definitely add the link.
- If I found the inspiration in a library book (one of my favorite places to look), I will of course give you the source.
- I did it! I will share what worked (and sometimes what didn't work) for me, and give my little "Extra!" or in other words, a little bit of a "my two cents" blurb about my experience with the project, and hopefully inspire you!
- Some letters of the alphabet will have several featured projects, others will have few. Without even thinking of doing an alphabet series ahead of time, I figured I have completed projects that I am excited to share with you, for all the letters except for e, x, & y. I have a few thoughts in the works, but if you have any suggestions, please share!
- Right now the goals are these: 1) to present at least ONE project for every letter, 2) present in alphabetical order, and 3) get to "Z" before Baby #2 arrives in June! :) Whew! Let's begin!
Subscribe to:
Posts (Atom)